Installation
Ringo depends on some external libraries, like Pyramid, SQLAlchemy and Formbar. Pyramid is a very general open source Python web framework. SQLAlchemy is a very mature and powerfull ORM to get an abstraction layer to your database. Formbar is a library to layout and handle HTML forms in a easy way.
There are of course many ways to get this and other depended libraries installed on your system. The most easy way is to install all this stuff into an isolated Virtualenv.
Prerequisites
- You will need a Python 2.7.* to get started.
- PostgreSQL
- Access to the internet to load depended packages.
The installation of Ringo is done in four steps. First we need to install some Basic supplement packages which are needed later in the installation process. Second install a Virtualenv where all the python packages will be installed. Third we need a DBMS and therefor install Postgres. Finally the last step will Bootstrap Development Environment.
The following examples are tested on a Ubuntu 16.04 installation.
Basic supplement packages
Curl is used to fetch the bootstrap script which is used in the last step of the installation.
Git is the SCM tool of choice for the Ringo development. To be able to checkout the related packages during the bootstrap process you need to install git.
Install all supplement packages:
apt-get install curl git
Virtualenv
A virtualenv is a isolated python environment is used to install python packages independently from your systems python environment. Using virtualenv you can setup unlimited number of independent environments for your development.
Install the virtualenv using the package manger:
apt-get install python-virtualenv
If you are not familiar with the use of a virtualenv then can have a look at the userguide of virtualenv.
Postgres
Ringo requires a Postgresql database. Further we need some development packages because python postgres driver will be build on Bootstrap Development Environment.
Install Postgres the package manger:
apt-get install postgresql
apt-get install postgresql-server-dev-9.5 python-dev gcc
Now create a user in the database. This user should have the same name as the user who is going to run the application later. This user will be used to connect to the database. The uses must be allowed to create new databases. In this example we create a user ringo:
su postgres
createuser -d ringo
This user and his credentials are later needed in den *.ini application configuration to configure the db connection.
Even that Ringo uses a ORM such as SQLAlchemy Ringo currently relies on a Postgresql database. This is mainly for historical reasons: There has been times where the default database of Ringo was SQlite. But migrating the schema of the database during the developement was a huge pain, because of its limited support of SQL commands. Hower maybe this will change again in the future. If you want to help please have a look at the related issue
Python3 support
I’m sorry. Python 3 is currently not supported. Your help to port Ringo for Python 3 is welcome!
Quickstart
Bootstrap Development Environment
To start with an empty development environemt do the follwing:
apt-get install git
curl -O https://raw.githubusercontent.com/ringo-framework/ringo/master/bootstrap-dev-env.sh
sh bootstrap-dev-env.sh ringo
This command will generate a folder which includes some subfolder for the virtualenv and needed libraries:
ringo
|-- env
|   |-- ...
|   `-- bin
`-- lib
    |-- brabbel
    |-- formbar
    `-- ringo
The general layout of an development environment looks like this:
* appname: Root folder of the environment. Usually named with the name of the
  application.
* lib: Folder for libraries. To be able to have differen versions of the core
  libraries ringo and formbar I recommend to install the development version
  for each application.
* env: The virtual python environment.
A minimal Application
Activate the virtualenv and change into you development environment:
cd /path/to/your/development/environment
source env/bin/activate
Create a fresh application based on a ringo project template:
pcreate -t ringo foo
mv foo src
cd src
python setup.py develop
Optional: Setup the database connection in the generated development.ini file and configure the user you created in the process of installing Postgres. If you followed the instructions you’re done and no further action is needed. However here is an example how to change the connection to database.:
-sqlalchemy.url = postgresql://@/foo
+sqlalchemy.url = postgresql://user:password@localhost/foo
Create a new database for your application and initialise the database using the ringo-admin db:
createdb foo
foo-admin db init
Start the application:
pserve --reload development.ini
Extending existing Application
Ringo allows to build applications which are based on another application. I will call it baseapp from now on. This needs some further steps after you created a single application as described in A minimal Application.
You need to add the baseapp into your requirements file.
After creating the application you need to modify the __init__.py file of your application to include the configuration of the baseapp application:
# Include basic ringo configuration.
config.include('ringo')
config.include('baseapp')
config.include('yourapp')
for extension in extensions:
    config.include(extension)
...
config.scan('baseapp')
config.scan()
If you also have overwritten views in your baseapp application you must also scan the foo package. Otherwide you application is not aware of these overwritten
In your ini file you need to set the base of your new application:
app.base = baseapp
In your ini file you need to add the directories for the mako templates:
# mako template settings
mako.directories =
    yourapp:templates
    baseapp:templates
    ringo:templates
mako.default_filters = h
baseapp is the name of the application which you want to use as a base. yourapp is the name of the application you are creating.
In order to have a working migration setup you will need to import the model of the base appliction to the model of the inherited application:
import bar.model
This will ensure that all the model will be available to alembic. Otherwise many tables would be scheduled for a drop.
The initialisation of the database is a little bit different as we want to initialize the database with the migration scripts and fixtures of baseapp:
bar-admin db init --base baseapp
bar-admin fixtures load --app baseapp
While the migration scripts are copied from baseapp to yourap when initialising the database for the first time, the fixtures are not! yourapp only includes the fixtures from the base ringo application. If you want to use the fixtures from baseapp on default, then you need to copy the files yourself:
rm </path/to/yourapp/yourapp/fixtures/*
cp -r <path/to/baseapp/baseapp/fixtures/* </path/to/yourapp/yourapp/fixtures
Voilà! That is it.
Tutorials
Importing and Exporting data
It is possible to export and import the data of modules in different formats. Supported formats are JSON and CSV. The default is to export and import JSON.
In order to make items of a modul identifiable when exchanging data between different databases, each item is given a UUID upon creation. By default, these UUIDs are used as an identifier to decide during import whether an item is new or already present in the target database. An item without identifier (though it cannot be obtained by export) is always considered new. New items will be created in the target database. Already present items will be updated.
Import and export can be triggered in the UI (if the user has sufficient permissions and it is enabled) or using the CLI commands from ringo-admin db to Export data and Import data.
How to make config changes permanent
Ringo allows to change the configuration of the application through the UI in many ways. You can add new roles, set permissions etc. All those changes are done in the database. As those changes will get lost when dropping and recreating the database we need a way to make save these changes in a way that they do not get lost when reinitialize the application.
The typical way is to write a migration script and to put the changes you made into this script. An empty migration script can be generated like this:
ringo-admin db revision
An easy way to get the changes in the database is to diff between the dump of the database. On dump is done before the changes are mare:
DB=ringo
pg_dump -a --column-inserts $DB | grep INSERT > $DB.dump.pre
Now you can do the changes in the application and dump the database again:
pg_dump -a --column-inserts $DB | grep INSERT > $DB.dump.post
Finally you diff the two dumps and ideally get the changes made in the database ready to put into the migration script:
diff $DB.dump.pre $DB.dump.post | grep INSERT | sed -e 's/> //g' > inserts.sql
Work with modules
Add a new modul
Please make sure you understand the concept of Modules before adding a new module. In some cases it might be sufficient to only Adding views.
First you create the initial files and a migration to “install” the module in your application using the ringo-admin modul command. Please use the singular form of the name of the module:
ringo-admin modul add <modulname in singular form>
This will generate a bunch of files:
- A model file
- A XML configuration for the form configuration
- A JSON configuration for the overview/listing configuration
- A migration file to install the modul.
Upgrade the database to apply the generated migration and to install the initial data for the module by using the ringo-admin db command:
ringo-admin db upgrade
The module is now installed and ready for use. Restart your application. The module should now be listed in the main menu. You can already call all CRUD actions of the module, but for now no data is saved as the model of the module is basically empty. So its time to add some fields to your new module.
Add new fields
Adding new fields to the module means finally means adding new fields to the model of the module and finally to do a migration.
There are two ways to to this:
- You do all the work on your own and add the fields directly in the model file of your module. If you want to choose this way I recommend reading the SQLAlchemy documentation on Decalaritve Mapping
- You focus on developing the form of the module and let Ringo generate the relevant part of the model your you. This way you only need to copy and paste the generated model code into your model. If you choose this way than you should become familiar with the Form configuration (Which is a crucial part of Ringo development anyway).
Whatever way you choose it finally ends in the generating a migration file and upgrading the database using the ringo-admin db command:
ringo-admin db revision
ringo-admin db upgrade
Build relations between modules
Adding a relation between two modules is usually done in two steps:
- Add fields to the model for the foreign key and add an ORM relation.
- Migrate the database.
Here is a short example from ringo/model/user.py:
class User(BaseItem, Owned, Base):
        ...
        sid = sa.Column(sa.Integer, sa.ForeignKey('user_settings.id'))
        # user_settings is the name of the table in the database for
        # the settings. This field refers to the id column of that
        # table.
        ...
        settings = sa.orm.relationship("UserSetting", uselist=False,
                                       cascade="all,delete")
        # UserSetting is the name of the Python class to which the
        relation is set.
If you want to use this relation later in forms than you must refer to the settings attribute of the User and not to foreign key.
There is nothing specific in Ringo on adding a foreign key and a relation to the model so all relevant information can be found in the ORM documentation of SQLAlchemy.
Tip
If you have a bidirectional relation between to modules we recommend to set up the ORM relation in both modules instead of using the backlink feature of SQLAlchemy. Writing to relations tends to be better readable esspecially when it comes to cascading rules.
Extend modul with a mixin
Please make sure you understand the concept of Mixins before extending the module. In some cases it might be sufficient to only Adding views or Add a new action to a modul.
Add a new action to a modul
Initially each module has only the default CRUD actions actions available. However the module can be extended by adding a new specific action.
In the following example we will add a foo action to the bar module.
Action entry
Get the modul id of the bar modul from the database:
select id from modules where name = 'bar';
-> 1000
Get the max id in the actions table:
select max(id) from actions;
-> 118
Add a new action entry for this module in the database. Create a new migration file for this:
ringo-admin db revision
Open the new generated migration file and add the following statement to upgrade the database. Use the modul id and the next id of the action entry:
INSERT INTO actions (id, mid, name, url, icon, description, bundle, display, permission)
VALUES (119, 1000, 'Foo', 'foo/{id}', 'icon-eye-read', '', false, '', '');
Note
If you want to add a action which should also be available as a bundled action (selectable from the dropdown on the overview page) you need to set the bundle attribute to ‘true’.
Find details on the values for the action entry in ActionItem source
Don’t forget to add the statement to downgrade the migration as well:
DELETE FROM actions where id = 119;
After manual inserting a new action entry in the database you need to fix the sequences in the database:
ringo-admin db fixsequence
View
Create a new callable for the foo action. Usually this is done in the /views/bar.py:
from pyramid.view import view_config
from ringo.lib.helpers import get_action_routename

from myapp.model.bar import Bar

@view_config(route_name=get_action_routename(Bar, "foo"),
             renderer="/foo.mako")
def my_foo_view(request):
    # Implement logic here.
    return {}
Bundle view
This is an example of a simple bundled action:
from ringo.lib.helpers import get_action_routename
from ringo.views.base.list_ import set_bundle_action_handler
from ringo.views.request import is_confirmed
from ringo.lib.renderer import (
        ConfirmDialogRenderer,
        InfoDialogRenderer
)

from myapp.model.bar import Bar

def my_bundle_view(request, items, callback=None):
    if (request.method == 'POST' and
        is_confirmed(request)):
            for item in items:
                pass # Do the action for each item here.
            renderer = InfoDialogRenderer(request, "Title", "Body")
            rvalue = {}
            rvalue['dialog'] = renderer.render(url=request.route_path(get_action_routename(Bar, "list")))
            return rvalue
    else:
        renderer = ConfirmDialogRenderer(request, Bar, "foo", "Title")
        rvalue = {}
        rvalue['dialog'] = renderer.render(items)
        return rvalue

set_bundle_action_handler("foo", my_bundle_view)
This bundled action will show a confirmation dialog which needs to be confirmed. After that the view will iterate over all selected items and show a info dialog at the end.
Permissions
Modifications on the permissions should be done in a migration script:
ringo-admin db revision
So here are the required steps to craft the needed INSERT and DELETE statements.
First get the id of the role which should be able to call the action:
SELECT id FROM roles WHERE name = 'users';
-> 2
Now SQL statements for the migration script will be:
INSERT INTO nm_actions_roles (aid, rid) VALUES (119, 2);
DELETE FROM nm_actions_roles WHERE aid = 119 and rid = 2;
As always when manually inserting something in the database call the fixsequence command:
ringo-admin db fixsequence/gp_dump
Setup breadcrumbs
Breadcrumbs are a great way to help users to navigate through a nested set of related modules and alway show them where they are.
Ringo can show breadcrumbs. They are optional. If you want them you need to configure a Sitemap. The sitemap is build in the __init__.py file of your application:
from ringo.lib.sitetree import site_tree_branches
sitetree = { your sitetree configureation goes here }
site_tree_branches.append(sitetree)
For a detailed description on how to build a see the documentation of the sitetree module.
Sitetree module
Modul to handle the sitetree structure of the application in order to render a breadcrumb widget.
The sitemap is a dictionary which builds a tree hirachy of the application. It should have the following structure:
{
    "key": {"parent_site": $parent_key,
            "parent_item": $attritute_of_item_which_links_to_parent
            "display_item": $alternative_item_to_display,
            "display_format": "Prefix of {item}"
            "actions": {'foo': 'Foo description'}}
    ...
}
- key
- The key of the dictionary is the base URL of the modul. E.g Calling the edit page of the user modul have the URL users/edit/1. In this example users is the base URL. If this url is called the the entry point to build the breadcrumbs will be the entry in the dictionary named users. If no key can be found in the dictionary which named like the base url than no breadcrumbs can be build and no breadcrumbs are visible in the UI. This way you can configure breadcrumbs on only selected pages.
- parent_site
- The parent_site refers to a key of the parent site in the sitemap. It must match the name of a key in the dictionary.
- parent_item
- The item defines the name of the attribute of the currently loaded item (in the model) which links to the parent item in the models hirachy tree. Think of haven in A -> B -> C relation in your model and you call the page to edit C. Then item refers to the name of C’s attribute which links to B.
- display_item
- Usually the str representation of the related item is used as breadcrumb element. Setting the display_item allows to define the name of an attribute to an alternative value to display.
- display_format
- Additionally to the alternative item to display you can define the format on how to display the item. This can include some addtional string to give some more context information.
- actions
- You can optionally define some additional actions which should be displayed in the breadcrumbs. On default only the create action will be show as for all other actions the context is clearly defined by the header of the current page. If you define some custom actions for a modul it isn’t handled by default. So if you call the custom action the breadcrumbs will only show the default breadcrumbs. As the last entry in the breadcrumbs does not provide a link you might be missing a way back to where you come from. To prevent this behaviour you can define addtional actions which will be shown.
Work with extensions
Add a new extension
The following commands will create a new extension namend “evaluation” and install it in your system to make it available for other applications:
pcreate -t ringo_extension evaluation
cd evaluation
python setup.py develop
If your extension provides some extension specific actions they should be implemented in a Extension Mixin class. Overwrite the ‘get_mixin_actions’ method to define the actions the extension should provide to other modules:
class Evaluable(Mixin):

    @classmethod
    def get_mixin_actions(cls):
        actions = []
        # Add Evaluation action
        action = ActionItem()
        action.name = 'Evaluate'
        action.url = 'evaluate/{id}'
        action.icon = 'glyphicon glyphicon-stats'
        action.permission = 'read'
        action.bundle = True
        actions.append(action)
        return actions
Use an extension
Adding a extension into your application, and making it available for later coding basically consists of two basic steps:
- Register the extension in the application. This first registration may include modifications of your datamodel.
- In case of changes in the datamodel, these changes must be made reproducable for later installations. This is done by writing a migration script.
Register the extension
First create a backup of your current database! Registering a extension in your application may involve modifications of the database. Having a backup is a good idea anyway but also in important step to be able to see changes made while registering.
The example assumes using a PostgreSQL database.
Here we go. First backup your database and ensure you acually have the data in form of INSERT statements:
pg_dump -a --column-inserts efa | grep INSERT > efa.dump.pre
Now register your extension in your application. Registering is done in three steps.
In the model/__init__.py file of your application:
import os
from ringo.model import Base, extensions
from ringo.lib import helpers

extensions.append("ringo_news")

# Dynamically import all model files here to have the model available in
# the sqlalchemy metadata. This is needed for the schema migration with
# alembic. Otherwise the migration will produce many table drops as the
# tables of the models are not present in the metadata
In case your extention provides custom templates you need to configure an additional search path for your templates in the ini file:
# mako template settings
mako.directories = ringo:templates
mako.directories = ringo_evaluation:templates
Now start your application. You will notice a warning on the startup saying that you are missing a modul entry for the new registered application:
2016-01-15 08:49:06,652 WARNI [ringo.lib.extension][MainThread]
Extension 'news' is missing a entry in DB. Missing migration?
For now we will initially create these entries in the database by invoking the following command:
ringo-admin app add-extension ringo_news
This command will add the initial entries for the extension in your database. It time find out what actually has been added to the database to be able to readd these modification later in the migration script:
pg_dump -a --column-inserts efa | grep INSERT > efa.dump.post
diff efa.dump.pre efa.dump.post | grep INSERT | sed -e 's/> //g' > inserts.sql
The file inserts.sql include the modification in your database to register the extension.
The next startup of your application will show that the extension has been loaded:
2016-01-15 08:59:06,639 INFO  [ringo.lib.extension][MainThread]
Extension 'news' OK
Registration is finished with this step. You now must create a migration script to add futher tables in your database and to make the registration of the modul persistent.
Create an initial migration script
A migration script is used to make the registration and modification of the database by the extension persistent. So you can install the application later without doing these steps over and over again.
Lets begin with creating a new migration script by invoking the following command::command:
efa-admin db revision
This creates a migration script and in case the extension adds new tables to your application the migration also include migration to add these tables.
Now add the dumped SQL statements from the inserts.sql into the new generated migration script to make the registration of the new extension happen completly in the migration script and new application can be setup in one single step.
What next?
After you registered the extension and make the changes persistent in a migration script its time to use the extensions functionallity.
How to use the extension is heavily depended on its type. Please refer to the extensions documention for further information. But here is a general hint:
Many extension allow to enhance the functionallity of your existing modules by using Mixins. In case of the ringo_tags extension you can make modules tagable by inheriting the Tabable Mixin class:
class MyClass(Tagable, ..., BaseItem, Base):
Often these mixins require further database migration to add relations to your model. You will need to create seperate migration scripts again by using the ringo-admin db revision command.
Form configuration
Form configuration is done in XML files. Configurations are stored in <yourproject>/views/forms/ folder.
Ringo uses the formbar library for form handling.it gives you plenty of nice features like easy design, validation, conditional fields and rule expressions to only name some of them.
Tip
You can easily add fields to the form, change the layout and see the results immediately when you reload the page. This is a great help when you design forms. The only restriction to this is storing the data and doing
Using formbar
Please have a look into the formbar documentation to learn how to configure forms using formbar and check the forms in ringo/views/forms for some examples.
Generate model fields
After you have added new fields to the form you need to add those fields to the model too. Ringo provides a small helper command for this which will generate the relevant fields from the given form for your model:
ringo-admin modul fields <name of modul in plural form>
This will print some code to stdout which can be pasted into the model of the module.
Don’t forget to generate migration and upgrade the database:
ringo-admin db revision
ringo-admin db upgrade
Ringo specific renderer
Ringo comes with some specific renderers which extends the default renderers of formbar. They usually are aware of accessing to Ringo specific attributes like permissions checks e.g.
Checkbox
Dropdown
-
class
ringo.lib.renderer.form.DropdownFieldRenderer(field, translate)[source]¶ Ringo specific DropdownFieldRenderer. This renderer add a small link next to the label to make it possible to jump to the selected item in the dropdown list.
- nolink: Flag “true” or “false” to configure completly disable linking Default to “false”.
Links
-
class
ringo.lib.renderer.form.LinkFieldRenderer(field, translate)[source]¶ Will rendere a Link to the item. The item which will be linked can be set by
- the name attribute of the entity
- the value attribute of the entity
If the item can not be determined by one of the options above the item will be the item linked to the form.
The following option in addition to the base Linkfield Renderer are supported:
- openmodal: If true the item will be opened in a modal form. Defaults to false. If true a backlink will be generated too.
- action: Name of the action for which the link will be rendered. Defaults to None with means the link will be either to the read or update view.
- css: CSS classes for the link.
- backlink: If set to true a backlink will be generated.
- target: Set target attribute of the link.
Listings
-
class
ringo.lib.renderer.form.ListingFieldRenderer(field, translate)[source]¶ Renderer to render a listing of linked items. Used attributes:
- form: Name of the form which is used to add new items
- table: Name of the table configuration which is used to list items
- hideadd: Flag “true” or “false” to configure hiding the add button.
- nolinks: Flag “true” or “false” to configure completly disable linking.
- showsearch: Flag “true” or “false” to configure rendering a search field.
- showall: “true” or “false”. If true all items (linked and unlinked) regardless if the current user is allowed to read or update the item will be listed. However clicking on items the user has no permission to read will have no effect as no links are rendered for those items. Defaults to false.
- onlylinked: “true” or “false”. If true only linked items will be rendered. Checkboxes will be hidden.
- multiple: “true” or “false”. If false only one option can be selected. Defaults to true. Note that this restriction is only implemented on client side.
- openmodal: “true” or “false”. If true the item will be opened in a modal popup.
- backlink: “true” or “false”. If true the user will be redirected back to the listing after creating a new item. Defaults to true.
- action: Define the action which will be called when clicking an an entry. On default the action will be determined by checking the users permission and choosing between “read” or “update”. Setting action you can enforce using a certain action if the user has sufficient permissions.
Example:
<entity id="foo" name="name_of_the_orm_relation" ...>
    <renderer type="listing" showall="true" table="details"/>
</entity>
Please note that the name of the entity must be the name of the relation in the ORM model which links the items you want to list in the listing.
State
-
class
ringo.lib.renderer.form.StateFieldRenderer(field, translate)[source]¶ Ringo specific DropdownFieldRenderer to change the current state of an item. This renderer will render a combined widget containing a textfield showing the current state of the item and a dropdown with available actions which can be done from this state.
layout: Option to change the layout of the statefield. The renderer offers currently three options to render setting the layout attribute of the renderer:
- default: In default the renderer shows the current state with description and the resulting state and description when choosing a transtion.
- simple: Simple will render a simple dropdown with the current state as part of the fields label and the available transitions as options of the dropdown
- button: Botton will render the current state the available transitions as a button. The button will work like a submit button of the form so if the user clicks on it the form data will be submitted and the state is changed.
Writing a new renderer
Ringo let you easily define your own custom renderer. Custom renderers are used to display the data in a free defined form. You can define new input elements or present you data in diagram e.g.
Writing an using custom renderers is done in two steps:
- You write the renderer and templates
- You bind in the new renderer in the application
Renderer part
First create a new renderer by ineriting from an existing one. Formbar and Ringo already provide some renderers which can be used. Renderers are usally located in lib/renderer.py or lib/renderer/form.py.
Here you see the code for a simple renderer:
import os
import pkg_resources
from mako.lookup import TemplateLookup
from formbar.renderer import FieldRenderer
from ringo.lib.renderer.form import renderers

# We need to configure the template lookup system and "register" a new
# location of the templates. Mako will search in this locations for
# templates to render.
base_dir = pkg_resources.get_distribution("namofapplication").location
template_dir = os.path.join(base_dir, 'nameofapplication', 'templates')
template_lookup = TemplateLookup(directories=[template_dir],
                                 default_filters=['h'])

# Now create your renderer. And define the template which is used on
# rendering.
class MyFieldRenderer(FieldRenderer):

    def __init__(self, field, translate):
        FieldRenderer.__init__(self, field, translate)
        self.template = template_lookup.get_template("path/to/field/template.mako")


# Finally register the template in ringo to make the renderer known in
# formbar.
renderers['myrenderer'] = Myfieldrenderer
A template looks like this:
<div id="${field.id}">
        I'm the body of your field with name ${field.name}. In
        ${field._form} which is there to render fields of
        ${field._form._item} with renderer ${field.renderer}. Add
        content here.
</div>
View part
Using the new renderer is about configuring the renderer for an entity:
<entity ...>
        <renderer type="myrenderer"/>
</entity>
The type of the renderer is the name of the renderer under which it has been registered in ringo.
Using forms in views
Here is some pseudo code to get the idea. In the first step you need to get the form:
from ringo.views.helpers import (
        get_item_form,
        render_item_form
)
from ringo.views.request import (
        handle_POST_request,
        handle_redirect_on_success
)


# This is currently hackish :( A form needs the class and the item.
# This is usally part of the request already in case of the defalt CRUD
# actions. If we have a custom view we need to set those attributes in
# the request for ourself.
request.context.__model__ = ItemClass
request.context.item = item

form = get_item_form('nameoftheform', request)
Now we need to handle POST request of the form in case we actually want to save data and not only render the form. We use standard Ringo functionality for this:
if request.POST:
        if handle_POST_request(form, request):
                url = request.route_patch("nameofthisroute")
                return handle_redirect_on_success(request, backurl=url)

# In all other cases render the form. It's now up to you to return the
# rendererd form to the template.
rendered_form = render_item_form(request, form)
Overview configuration
-
class
ringo.lib.table.TableConfig(clazz, name)[source]¶ The TableConfig clazz provides an interface for configuring the overview of the the given clazz. The configuration includes
- Enabled features of the overview
- Which fields should be enabled in the overview
- Labeling of the fields
- Rendering of the fields
- Layout of the table (column width etc.)
The configuration of the overview is loaded from a an JSON configuration file which is located under view/overviews relative to the application root.
The configuration has the following form and options:
{
    "overview": {
        "columns": [
            {
                "name": "fieldname",
                "label": "Label",
                "width": "width",
                "screen": "xlarge",
                "expand": true,
                "filter": false,
                "title": "Tooltip title",
                "renderer": "path.to.renderer.callable",
                "strict": true
            }
        ]
        "settings": {
            "default-sort-field": "name",
            "default-sort-order": "desc",
            "auto-responsive": true,
            "advancedsearch": true
        },
        "filters": [
            {
                "field": "fieldname",
                "type": "checkbox",
                "expr": "",
                "regex": false,
                "smart": true,
                "caseinsensitive": true
            }
        ]
    }
}
The configuration can have configurations for more than one table configuration. The default name of a configuration is overview. The next sections defines the columns of the table. The columns are rendered in the order they are defined. Each column can have the following options:
- name: The name of the attribute within clazz which should be listed here.
- label: The label of the field.
- width: The width of the field. If not units are given the pixel are assumed.
- screen: Define from which size on this field will be displayed. Defaults to “small” which means rendering on all sizes. Available media sizes: (xlarge, large, medium, small).
- expand: The expand option is used to expand the referneces values in selections into the literal value of the corrispondig option. Note that this option is only usefull for selection fields in formbar which do not have a real relation attached. In all other cases the reference values are expanded automatically.
- filter: The filter determines if the rendered link is a filter link. A filter link is a shortcut to trigger a search with the current value of the field in the current column over all items. Defaults to No.
- title A tooltip will be rendered for the table header of the column.
- roles A comma separated list of rolenames. If defined the column will only be listed for users which have the given role. Default behaviour is to list a columns to all roles.
- renderer defines a callable which is used to render the field in the form “app.lib.renderer.myrenderer”. The function will take the request, the fieldname, and the renderer as parameters.
- strict Log error if value can not be fetched. This is often a sign of errors in the datamodel. However. If you want you can disable logging errors for this attribute.
- searchable A flag indicating whether the field should be searchable with datatables. By default all fields are searched.
- visible A flag indicating whether the field should be shown in the table. This can be combined with the searchable attribute to implement hidden, but searchable elements. By default all fields are shown.
Further the table has some table wide configuration options:
- sortable: If True, the table is sortable.
- default-sort-field: Name of the column which should be used as default sorting on the table. Defaults to the first column in the table.
- default-sort-order: Sort order (desc, asc) Defaults to asc.
- searchable: If True, the table is searchable and a search field is shown.
- default-search: Default search filter for the table
- advancedsearch: If False, a more complex overview with stacked search regex and save features is used. Otherwise a more simple overview. Default to use the simple overview.
- pagination: If True pagination of the results will be enabled. The table will have gui element to configure pagination of the table. Defaults to false.
- auto-responsive: If True than only the first column of a table will be displayed on small devices. Else you need to configure the “screen” attribute for the fields.
- show-info: It True than a info field showing number of items in the table
For DT tables you can define different search filters which are defined in the filters section. Filters is a list of different filter options. Each filter has the following options:
- field: The name of the field on which the filter will be applied.
- label: The label of the filter.
- active: If true the filter will be active.
- type: Type of the rendering. Currently only “checkbox” is supported. The checkbox renderer will active or deactive a filter a a certain row.
- expr: The expression for the filter.
- smart: If set to True this filter is a smart filter. Defaults to True.
- regex: If set to True this the expression is handled as a regular expression. Defaults to False.
- caseinsensitive: If set to True the search is caseinsensitive. Defaults to True.
Fields
Customs rendering
Sometimes you may want to render some information of the item in a different way. This is possible by setting the renderer config option and writing a custom render function.
Example field configuration:
{"name": "field", "label": "Fieldname", "renderer": "foo.bar.myrenderer"}
The field field must exist to prevent warnings while rendering the overview. However the field does not really matter here as the renderer will get all informations you may need to to a nice rendering. The renderer refers to a callable which is defined like this:
from ringo.lib.helpers import literal

def myrenderer(request, item, column, tableconfig):
    # Do the renderering. In case you return HTML do not forget to
    # escape all values properly and finally return a literal.
    return literal("<strong>Hello world!</strong>")
Sorting
Filters
Overwriting defaults
The behaviour of the application can be modified in different ways. You can customize the layout of forms, overviews and or the whole page layout and you can customize the logic of your application.
There are basically two ways to customize your application:
- Overwriting defaults to customize existing behavior.
- Extending existing application logic
Defaults in Ringo
If you have created a new application you may wonder that there are so less files generated. There are no views generated, no templates and you can not find any static files.
There reason for that is that ringo is using its defaults for the new application:
- Views for all modules including the basic CRUD actions has been configured
- on application start. They all use the base default actions defined in Ringo.
- Templates, form configurations, overview configuration and translations
- are searched in different locations. Actually on each request ringo tries to load a more specific version of a template but falls back to the ringo default as long as it can not find a
So if you want to customize your application you can overwrite the default.
Overwriting views
Application logic is defined in the view function. The view for specific actions can be overwritten. In the following example we will overwrite the default ‘index’ method of the ‘home’ view, but this also works for the CRUD actions of a module. Define your custom method in your view file:
@view_config(route_name='home', renderer='/index.mako')
def index_view(request):
    # Write your own logic here.
    handle_history(request)
    values = {}
    ...
    return values
Note, that we reconfigure the view by calling ‘view_config’ with an already configured route_name. This will overwrite the configured view and the application will use your custom view now for the route named ‘home’.
Important
Please do not forget to set the permissions checks in the view. If you overwrite a view which requires update permissions you must set this permission again in the view. Otherwise the permission check is disabled. To add a permission check you can add an permission attribute to the view_config call with the name of the required permisson in lower case:
@view_config(route_name='item-update', renderer='/update.mako', permission="update")
...
If you only want to extend the functionality from the default you can do this too. No need to rewrite the default logic again in your custom view:
from ringo.views.home import index_view as ringo_index_view

@view_config(route_name='home', renderer='/index.mako')
def index_view(request):
    # First call the default view.
    values = ringo_index_view(request)
    # Now extend the logic.
    ...
    # Finally return the values.
    return values
Using callbacks in the views
Callbacks can be used to implement custom application logic. They are injected into the view to implement custom behavior pre or post the actual view action.
This is useful e.g if you want to send notification mails, modify values after a new item has been created or clean up things after something has been deleted.
The most simple callback has the following structure:
def foo_callback(request, item):
    """
    :request: Current request
    :item: Item which has been created, edited, deleted...
    :returns item
    """
    # Do something with the item and finally return the item.
    return item
The request and the item should give you all the context you should need to to the desired modifications.
However the preferred way to implement callbacks is wrapping your callable in a using the callback class with allows you to add more informations to configure its behavior.:
from ringo.views.callbacks import Callback
my_callback = Callback(foo_callback, mode="pre")
This way to define the callback let you set time of execution of the callback
while processing the actual view. See ringo.views.callbacks for more
information.
The callback must be supplied in the call of the main view function like this:
@view_config(route_name=Foo.get_action_routename('create'),
        renderer='/default/create.mako',
        permission='create')
def create(request):
        return create_(Foo, request, callback=foo_callback)
In case you write your custom view and want to handle the callback you should
use the ringo.views.request.handle_callback() method.:
handle_callback(request, callback, item=item, mode="pre")
# Do the real action
handle_callback(request, callback, item=item, mode="post")
New in version 1.2.2: The callback can now optionally be a list of callback functions. This can be used to stack multiple callbacks.
Overwriting static files
Static files are templates, form and overview configurations. To overwrite the default simply copy the file from ringo into your application with the same name at the same location. Now you can do the modifications in the copied file.
Hint
In case you want to overwrite the forms checkout formbars inheritance and include feature if you only want to do small changes.
After that restart ringo so that ringo knows about new files it should consider to load. On the next request you application should load the overwritten version of the file.
Overwriting translations
Add custom logo
Custom CSS
Custom Javascript
Adding views
There is almost no ringo specific magic on adding new views to the application to implement new functionality. Adding new views is basically pure Pyramid as described in the Pyramid documentation on view configuration.
So just create a new view callable and configure it with the ‘@view_config’:
from pyramid.view import view_config

@view_config(route_name='fooroute', renderer='/foo.mako')
def foo(request):
        # Do the work and return values which are available in the
        # template as # dictionary
        return {}
and add the route configuration in the ‘__init__.py’ file of your application:
config.add_route('fooroute', 'path/to/foo/view')
Often you want to to do something with items of a modul. When using a simple view the item is not already part of the request on default. This can be changed by defining a ressource factory which will load the item. In the following example a Foo item with the given id in the URL will be loaded and is available in the item as request.item.:
from ringo.resources import get_resource_factory
from app.model.foo import Foo

config.add_route('fooroute', 'path/to/foo/view/{id}',
                 factory=get_resource_factory(Foo))
The home.py view is a good starting point to see how a simple view is added to Ringo.
However there are some limitations on views. This is because they are not so deeply integrated into the ringo framework. They are a quick way to add some functionality which the following drawbacks:
- Permissions to call the view can not configured by setting permissions in the rolesystem. Permission checks need to be implemented within the view. See Setting permissions for more details.
- The view can not be displayed in the action bundle, or the context menu of a single item. You need to make the view available by either adding a link in a template (Call view from template) or as button in the form (Call view from within forms) on your own.
If one or more points are crucial for you then you might want to Add a new action to a modul.
Setting permissions
Permisson related methods are defined in lib.security. Here is an example of how to check if the current user is allowed to read a certain item:
import pyramid.httpexceptions as exc
from ringo.lib.security import has_permission
from app.model.foo import Foo

def foo(request):
    item_id = request.params.get("id")
    factory = Foo.get_item_factory()
    item = factory.load(item_id)
    # You can check for one of the known CRUD actions. It will be
    checked against the permissions of the current user in the
    request.
    if not has_permission("read", item, request):
        raise exc.HTTPForbidden()
    # continue...
    return {}
Make sure you do the permission check as the very first thing in the view.
Call view from within forms
Calling a view in the form is basically done in the same way as described in Call view from template. You will utilize the HtmlRenderer of formbar to render the link.
Call view from template
Assuming you have configured a new view with the routename myroutename than the example code to render a link as a button in the following goes like this:
<a href="${request.route_path('myroutename')}" class="btn btn-primary">Click me</a>
Custom authorisation
If you need to change the way Ringo builds the ACL on default you can change this behavior by
overwriting the _get_permissions class method of the BaseItem in your model:
from pyramid.security import Allow

@classmethod
def _get_permissions(cls, modul, item, request):

    # Default ACL. Direct access
    permissions = BaseItem._get_permissions(modul, item, request)

    # The default permissions are configured using the setting from the
    # roles. We can now modifiy/extend the default permissions. In the
    # following example we allow of users with role "foo" to read the
    # item
    permissions.append((Allow, 'role:foo', 'read'))

    # An alternativ can be to allow a specific user (by its id/uid) to
    # access the item
    if has_role(request.user, 'foo'):
        uid = request.user.id
        permissions.append((Allow, 'uid:{}'.format(uid), 'read'))

    return permissions
Ownership inheritance
It is possible inherit the ownership (uid, gid) of a element from a related element when saving the item. Inheritance of ownership means to set the ownership of the item based on the ownership of another item and not with the uid, gid of the current user or other permission settings like default groups.
Note
Setting the inherited uid or gid only happens when saving the item explicit using the save method of the BaseItem. On default this is only the case when creating new items.
A typicall usecase is to grant users access to the item if they are allowed to access a related (often parent) item by inheriting the uid and gid.
To inherit the ownership you must set a special attribute in the model:
class Foo(BaseItem):
    _inherit_gid = "parent"
    _inherit_uid = "parent"

    ...
    parent = sa.orm.relation(Bar)
You need to define the name of the relation to the item where the uid and gid will be taken from. Please note that you can also set only one of the attibutes.
Inheritance from other applications
Lets say you have a appliation called ‘’Foo’’ which should be used as a platform in the same way as ringo was a platform for the ‘’Foo’’ application. Now you want to create an application ‘’Bar’’ based on ‘’Foo’‘.
The procedure to this is almost the same despite three things.
1. After creating the application you need to modify the __init__.py file of your application to include the configuration of the ‘’Foo’’ application:
# Include basic ringo configuration.
config.include('ringo')
config.include('foo')
config.include('bar')
for extension in extensions:
    config.include(extension)
...
config.scan('foo')
config.scan()
If you also have overwritten views in your ‘’Foo’’ application you must also scan the foo package. Otherwide you application is not aware of these overwritten methods.
2. The search path for the mako templates need to be extended as we want the templates of the ‘’Foo’’ application in our application too:
# mako template settings
mako.directories =
        bar:templates
        foo:templates
        ringo:templates
3. In order to have a working migration setup you will need to import the model of the base appliction to the model of the inherited application:
import bar.model
This will ensure that all the model will be available to alembic. Otherwise many tables would be scheduled for a drop.
4. Set the configuration variable app.base to ‘’foo’‘. See Application Base for more details.
5. The initialisation of the database is a little bit different as we want to initialize the database with the migration scripts and fixtures of ‘’Foo’‘:
bar-admin db init --base foo
bar-admin fixtures load --app foo
While the migration scripts are copied from foo to bar when initialising the database for the first time, the fixtures are not! The bar application only includes the fixtures from the base ringo application. If you want to use the fixtures from foo on default, then you need to copy the files yourself:
rm </path/to/bar/>/bar/fixtures/*
cp -r <path/to/foo/>/foo/fixtures/* </path/to/bar/>/bar/fixtures
Voilà! That is it.
Internationalisation I18n
Ringo uses the Babel package for handling the message catalogs. Translation of Ringo and Ringo based applications can be done with the following steps. First move into your application root folder and invoke the following command to extract all messages which should be translated:
python setup.py extract_messages
This will generate a new pot-File. Now update the catalogs of the different languages. Please note the ‘-N’ flag to tell babel to be not to smart about fuzzy strings in the translation:
python setup.py update_catalog -N
It is now time to edit the generated message catalaog and to put in the missing translations. Finally call the following command to actually compile the translations and to make them available in your application:
python setup.py compile_catalog
Further information of the process of internationalisation in a Pyramid application can be found on i18n in Pyramid
Under the hood
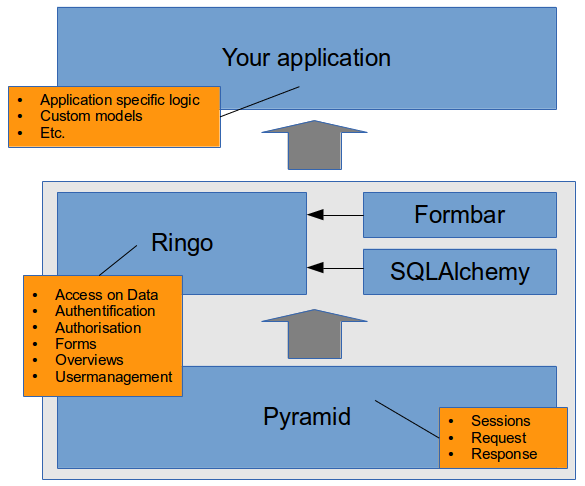
Ringo is a Pyramid based application which can be extended to build your own applications. This is a layered architecture where Pyramid brings in the basic functionality like session handling and handling requests and responses in web applications. Ringo sits on top of Pyramid and provides commonly used functionality often used in modern web applications.
Note
Ringo is also a standalone application. You do not need to build another application on top of ringo to get something working to get an impression of ringo or start developing. Ringo is under steady development. This is a benefit if you use Ringo as base for your application. Your application will get bug fixes, new features or improved functionality in most cases by simply updating Ringo to a new version.
Ringo itself uses some external libraries to provide some of its functionality. E.g the formbar library is used to build all forms and do validation. The access to the database is done with the ORM SQLAlchemy.
A ringo based application is another pyramid based application which basically extends ringo. See Exending An Existing Pyramid Application for more details on how this is done.
All this magic is already done in a pyramid scaffold which comes with ringo. Using this scaffold will create an application which uses ringo functionality by simply importing it at the right places and take care the basic configuration is done in the proper way.
Modules
The term “Module” is central and often used in ringo. Therefore it is important to understand what a module is.
In short: Ringo’s functionality is the sum of all modules functionality. Ringo or a ringo based application can be extended by adding new modules. If there is any data in the application which needs to be created by the user and stored permanently in the database it is very likely done within a modul.
Example: Think of an application to organise your orders in a shopping application e.g. So you will have to store customers, articles, orders, prices, addresses etc. Each of those will be its own modul.
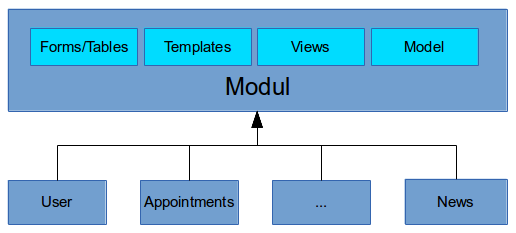
A module provides the infrastructure to work with a certain type of data in a web application. Where certain type of data means users, files, movies etc. rather than integers or datevalues. Lets call them items from now on.
Basically a module consists of
- a model for the items you want to work with
- views to handle incoming request and generating the proper responses for
- templates which define how the pages in the application will look like.
- configuration files to define how the forms and overview tables will look like.
CRUD actions
Modules provide actions which can be used to manipulate the item of a module. Ringo provides some basic CRUD [1] actions which are available on default for every module.
- Create: Create new items.
- Read: Show the item in detail in readonly mode.
- Update: Edit items of the module.
- Delete: Deleting items.
- List: Listing all items of the module. This is slightly different to the action to read a single item.
- Import (CSV, JSON)
- Export (CSV, JSON)
| [1] | CRUD means: Create, Read, Update, Delete |
Extensions
Extensions are external plugable modules. They are used to add generic functionallity to the application in a dynamic way.
In contrast to modules, extensions do not implement application specific stuff, but are generix with functionallity which is usefull for all kind of applications. An example might be an appointment extensions which allows to extend the application with an appointment feature.
For more information on how to create and register extensions please refer to the Extensions part of the documentation.
Extension may extend the existing database and adds tables to save data (e.g appointments and relations of appointments to users.) or they are lightweight and just provides some functionallity like anonymisation.
Extension can be Registered to an application by adding the extentions in the extensions list located in the modul/__init__.py file. As soon as the application is started the extension will be registered. To unregister a extension simply remove the extension from the extentions list.
Note
For extensions which modifies the datamodel of the application a seperate model migration is needed on registration and unregistration of the extension. (See alembic and ringo-admin documentation).
Mixins
Mixins can be used to add certain functionality to the items of a module. Mixins are used in multiple inheritance. The mixin ensures that the item will have all needed fields in the database and provides the proper interface to use the added functionality. Example:
class Comment(BaseItem, Nested, Meta, Owned, Base):
    __tablename__ = 'comments'
    _modul_id = 99
    id = sa.Column(sa.Integer, primary_key=True)
    comment = sa.Column('comment', sa.Text)

    ...
The comment class in the example only defines the two fields id and comment. But as it inherits from the Nested, Meta and Owned mixin it also will have date fields with the creation and date of the last update, references to the user and group which ownes the Comment. Further the ‘Nested’ mixin will ensure the comments can reference each other to be able to build a hierarchy structure (e.g Threads in the example of the comments).
Note
The Comment Mixin has been removed from ringo and converted in the the ringo comment extension.
Important
As most of the mixins will add additional tables and database fields to your item it is needed to migrate your database to the new model.
Available mixins
Meta
Owned
-
class
ringo.model.mixins.Owned[source]¶ Mixin to add references to a user and a usergroup. This references are used to build some kind of ownership of the item. The ownership is used from the permission system.
It is posible to configure inhertinace of the owner and group from a given parent element. This information is used only while creating new instances of the modul. If configured, the default group and owner information will be overwritten. This is done at the very end of the creation process. See ‘’save’’ method of the BaseItem. You can configure the inhertiance by setting the name of the relation to the parent item in the ‘’_inherit_gid’’ and ‘’_inherit_uid’’ class variable.
Nested
-
class
ringo.model.mixins.Nested[source]¶ Mixin to make nested (self-reference) Items possible. Each item can have a parent item and many children. The class will add two relation attribute to the inheriting class. The parent item is available under the parent attribute. The children items are available under the children attribute.
StateMixin
-
class
ringo.model.mixins.StateMixin[source]¶ Mixin to add one or more Statemachines to an item. The statemachines are stored in a internal ‘_statemachines’ dictionary. The current state is stored as integer value per item. This field must be created manually. The name of the field which stores the value for the current state must be the keyname of the ‘_statemachines’ dictionary.
Example Mixin usage:
class FooMixin(StateMixin):
    # Mixin inherited from the StateMixin to add the Foobar
    # state machine

    # Attach the statemachines to an internal dictionary
    _statemachines = {'foo_state_id': FooStatemachine}

    # Configue a field in the model which saves the current
    # state per state machine
    foo_state_id = sa.Column(sa.Integer, default=1)

    # Optional. Create a property to access the statemachine
    # like an attribute. This gets usefull if you want to access
    # the state in overview lists.
    @property
    def foo_state(self):
        state = self.get_statemachine('foo_state_id')
        return state.get_state()
Security
Security is an important aspect of ringo. This chapter will describe the permission system and explains how ringo handle common security threats.
Permission System
The permission system addresses two basic questions:
- Who is allowed to access some item in general and
- What is allowed for the user to access, in case he is generally allowed to access the item.
To answer these two questions the permission system of Ringo is a combination of concepts of the permission system known from the Unix file system and a roles based permission system.
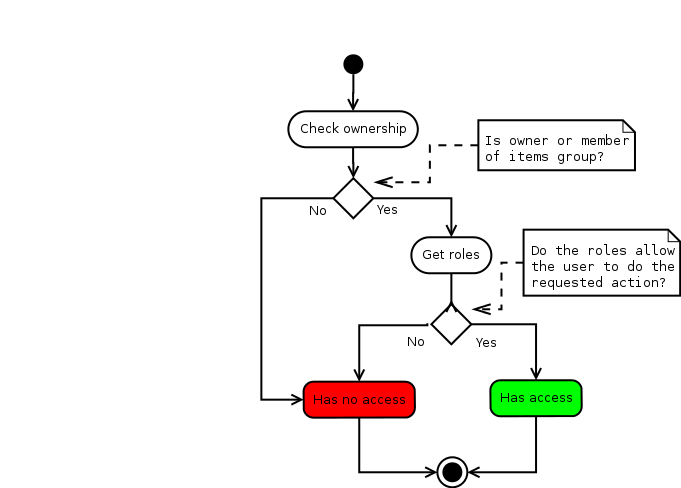
The Unix file system part answers the first question: Who is allowed? Therefor every item in the system inherited from the Owned stores information to which owner and which group it belongs to. Only the owner, members of the group or users with an administrational role are granted access to the item in general.
After the permission to access the item in general is allowed, the role bases system answers the second question: What is allowed. The permission system will now check which Roles the users have and which actions are allowed for these roles.
If the user is the owner of the item, or is member of the items group, then all permissions of the users roles will be applied.
Roles
-
class
ringo.model.user.Role(**kwargs)[source]¶ Roles are used to configure which actions on a specific modul are permitted to users. Roles are important during the permission checks to determine what the user can so which an item of a certain modul. However a role does not determine if the user has access to the item at all. This is left to the ownership checks. However a role can be configured to be a ‘administration role’. This means every user who has this role will pass the ownership check during the permission checks even if the user is not the owner or in the group of the item he wants to.
The specific actions a user is allowed to do on a item are stored in a internal list of ActionsItems. A user will be allowed to call all actions assigned to the role he is equipped with.
Authentification
Authentication is done once in the login process. If the user has logged in successful an auth cookie is saved. From then on the user object is loaded from the database on every request with the roles and groups attached to the user. This user object is used later for the Authorisation. If the user is not logged in the user object is empty.
The authentification has a default timeout of 30min. The timeout will be reset after every new request of the user. The timeout can be configured in the application configuration bei setting the ‘auth.timeout’ config variable.
Anonymous Authentification
On default Ringo does not provide an anonymous access to the application (Despite of some static pages). So you must login before you can work with the application and have appropriate permissions.
Anonymous access in Ringo is implemented by using a Proxy-User. This user must be existent in the database and properly configured. To enable anonymous access to the application you must configure this user as anonymous user. See “Anonymous” access for more details.
If enabled every request to the application will automatically be authenticated with the configured anonymous user (As long as the User is not already logged in). The request will be done with all configured permissions of the roles the configured anonymous has. So you can configure in details which permissions a anonymous user will have.
Warning
Be careful with the configuration of the anonymous user. Double check the permissions of the anonymous user and check the configuration in the ini file and make sure you did not configure a high privileged user like the admin as anonymous user.
To implement an anonymous access to the application you will need to do three things:
- Create a dedicated user which will be used as the anonymous user.
- Create roles with appropriate permissions on the different modules to grant this anonymous user access on the data. Please note, that these roles must be “admin” roles to disable the owner/group check on authorisation as we want the anonymous user to be able to basically all items. The only restriction is than configured by the permissions of the role.
- Enable this anonymous user in the ini file.
Authorisation
The permission system in Ringo uses the Pyramid Pyramid Authorisation and Authenfication API
Authorisation is done on every request. The authorisation will check if the user is allowed to access the requested resource.
A resource is an url or an item which is accessed by calling the url in your application. In all cases this resource is build from a resource factory for every request. Every resource will have an ACL which determines if the user of the current request (See Authentification) is allowed to access the resource.
Ringo’s part in the authorisation process is to build the ACL. This ACL is then used by the Pyramid security API. Therefor ringo implements helper functions to build ACL lists which model the ringo permission system.
See Adding Authorization tutorial for more information how things work in general under the hood.
See ringo.lib.security for documentation on helper functions used to build
the ACL.
Security measurements
Ringo has protection against common threads of webapplication included.
CSRF-Protection
To protect against CSRF attacks ringo follows the recommodation of OWASP and adds a synchroniser token to each form, which will be sent and checked on each POST request. The token will be unique on every request. GET requests in ringo are not protected as GET functions in ringo should be idempotent and does not trigger expensive opertaions. Following this simple philosophie on GET requests will make any further CSRF protection obsolete.
XSS-Protection
Ringo will add the following headers to protect the application against XSS attacks.
- ‘X-XSS-Protection’: ‘1; mode=block’,
- ‘X-Content-Type-Options’: ‘nosniff’
Further ringo provides an option to enable a contect CSP for further protection. The CSP is disabled on default but can be enabled in the application Headers configuration.
Clickjacking-Protection
Cookie and Session security
DOS-Protection
DOS protection is not handled by ringo. Protection against DOS-attacks should be handled by the Reverse Proxy or Firewall.
Basic DB Schema
Below you see the basic schema of the ringo database. The schema only lists some central tables which help to understand how the things are wired together in ringo. The table colored orange example table in the top left is an example for any other table which will store items of a modul. Every item of an item has a reference to the module it belogs to. Further the current example has a reference to a user and a usergroup which defines the ownership [2] per item is is important for the authorisation.
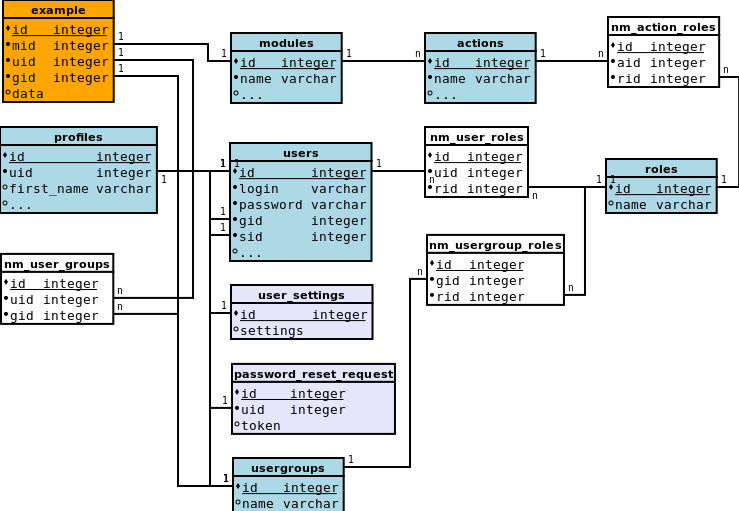
Let us begin with the modules table. This table will store information on all available modules in the system. It basically stores the configuration per modul. As described in the Modules section each modul has (CRUD actions) which are stored in the actions table. The NM-table nm_actions_roles define which roles are allowed to use the actions in the module. See Permission System for more information on how the Anonymous Authentification is implemented in ringo.
The users table stores all the users in ringo. The users table only holds minimal data which is required for authentification and authorisation. Additional information like the name, email etc. is stored in the profiles table. Every user has a profile.
Users can be organised in groups using the nm_user_groups table. All usergroups are stored in the usergroups table. Roles can be assigned to usergroups and users. This is done with the NM-table nm_user_roles and nm_usergroup_roles.
The table user_settings and password_reset_request are helper tables to save user settings like saved search queries or store the tokens to trigger the password reset.
| [2] | The ownership feature can be added by using the Owned mixin. |
States and Workflows
Ringo offers the option to equip items of the modules with a one or more state machines to model statefull workflows.
An classical example for a statefull workflow is a process where an item can be in an draft, review and published state.
The statemachine offers features like
- Restrictions on access
- Conditional transitions
- Handlers.
Depending on the state the state machine can be configured to restrict access to the item for certain users. Further you can define conditions which must be true before the state can switch into another. Finally you can write certain handlers which are called right after the state has changed.
A state machine can be attached to the items using a State Mixin which organises the state machines an provides a unique interface.
Configuration
The application can be configured by setting values in the
ini file. Ringo provides some helper methods to give directly access to
some of the configuration options.
Application
Helper methods giving access to the configuration options are available in the appinfo module.
Modul to get information about the application
-
ringo.lib.helpers.appinfo.get_app_mode(request)[source]¶ Will return a tuple of the mode configuration (if configured)
Tuple: (mode, desc, color)
If no mode is configured return None.
Request: Current request Returns: Tuple of mode configruation
-
ringo.lib.helpers.appinfo.get_app_title()[source]¶ Will return the title of the application
Returns: The title of the application
-
ringo.lib.helpers.appinfo.get_app_logo()[source]¶ Will return the path of the application logo. Which should be displayed.
Returns: The path to the application logo
-
ringo.lib.helpers.appinfo.get_app_inheritance_path()[source]¶ Returns a list of application names. The names describe the path to the root of the application inheritance. e.g if the current application is ‘foo’ which is based and ‘bar’ which is based on ‘ringo’ the function will return the follwing result: [‘foo’, ‘bar’, ‘ringo’].
The default path is [<nameofcurrentapp>, “ringo”]. The path can be extended by setting the app.base config variable.
Returns: List of application name which build the inheritance path.
Title
The name of the application used at various places in the application can be configured with the following varible.
- app.title = Application name
The title is available using the get_app_title() function.
Custom static directory
It is possible to define a directory to include custom static files which should not be part of the application. This can be usefull for application branding to place custom logo graphics etc. You can define the path to the root of that custom static folder.
- app.customstatic = /path/to/your/folder
Adding this configuration will make files under this location basically available in your application.
Let’s say you have a static image you want to access. You can do this in the followin way e.g in a Mako template:
request.static_url(h.get_app_customstatic('image.png'))
image.png must be relative to the configured customstatic path.
If customstatic is not configured the generated URL will link to the static folder in Ringo.
Logo
The logo of the application used in the header of the page. You can define a path to the logo relative to the given custom static directory which should be displayed. If no logo is set then no logo is displayed at all.
If you need more customization on the logo, then you need to overwrite the logo.mako template.
- app.logo = images/ringo-logo-64.png
The logo is available using the get_app_logo() function.
Application Base
Optional. Usually a ringo based application is directly based on ringo. So the default inheritance path of your application is foo->ringo (in case your application package is called “foo”).
- app.base = Default is not set
If your application is based on another ringo based application you can configure the name of the application here. Setting this configuration will modify the inheritance path of the application.
The inheritance_path is available using the get_app_inheritance_path()
function.
Example: The current application package is named “foo”. “foo” is based on “bar”. And “bar” is based on “ringo”. The inheritance path is foo->bar->ringo.
This has consequences for the loading of form and table configurations. When trying to load form or table configuration ringo will iterate over the inheritance path and try to load the configuration from each application within the inheritance path.
Application Locale
The locale is used to format dates times in the application. On default Ringo determines the locale by looking into the request getting the browser language setting. However you can enforce setting the locale of the application by setting the following config variable in your config
- app.locale =
If added (In the mean of adding the variable at all) the locale will be enforced. An empty value means use a “default” encoding which leads to dates formatted in ISO8601. Otherwise the locale must match a known ISO-3166 locale string.
Application Timezone
You can configure the timezone for the application. This timezone is used to convert the UTC datetimes into local datetimes. The configuration is done as string value. See https://en.wikipedia.org/wiki/List_of_tz_database_time_zones for a list of valid timezones.
- app.timezone = Europe/Berlin
The setting defaults to the configured timezone of the server.
Application Mode
The application can be configured to be in a special “mode”. Where mode can be a demo, development, education or any other flavour of your application. Setting the mode will result in some visual indication which is is different to the normal application mode.
- app.mode =
Short description of the mode. If this value is set a application will have some visual indication.
- app.mode_desc =
A longer description of the mode.
- app.mode_color_primary = #F2DEDE
- app.mode_color_secondary = red
The color of the mode indicator header and the border around the application. Defaults to #F2DEDE (light red) and red. Allowed values are any usable in CSS, such as hexadecimal or RGB values, named colors, etc.
The mode is available using the get_app_mode() function.
Application Readmode
You can configure to enforce opening items from the overview in Read-Mode on default. This is especially useful in applications where the majority of requests are made to read something rather to update an item. Setting the default open mode to read bring performance advantages as the internal effort to render the form is lower for read forms.
However the use can explicit switch to the update page from the read page using the context menu.
- app.readmode = True
The setting defaults to False, which means the application will determine if the user is allowed to update or read the items and will open the higher privileged page (update) if the user is allowed to.
History ignores
You can configure URL which will be ignored in history. This is often needed in case you do AJAX requests to fetch data. As you do not want those URL be part of the history you can configure to ignore those URLs.
- app.history.ignore = /foo,/bar,/baz
The ignore list is a comma separated list of fragments of an URL. The code will check if the current URL starts with one of the defined ignores.
Cache
You can configure to cache the loaded configurations for the form configs. This is usefull in production mode for a significant speed up when loading large forms with many rules and conditionals.
- app.cache.formconfig = true
The default is not to cache the configuration.
Testing mode
You can set the application in some test mode which is usefull to test the application. To enable the testmode set the app.mode attribute to testing.
In this mode you can start Testcases which are embedded in its own transaction on the database. In a Testcase you can do a series of queries to the application and add, delete or modify data. When you stop the Testcase the changes you have made in the Testcase will be rolled back.
When enabled the webinterface has an additional link to start and end a Testcase which will be handled in a transaction.
In unittests you can use the following URLs to start a Testcase:
- /_test_case/start
- /_test_case/stop
Feature Toggles
Feature toggles can be used to enable specific code paths in the application by setting a config variable in the ini file. This is usefull to make features which are currently under development available
Feature toggles are set in the ini file like this:
feature.mynewfeaure = true.
The configuration is available in the current request and can be used everywhere in the application where the request is available.:
if request.ringo.feature.mynewfeaure:
    # Feature is anabled
    pass
else:
    # Feature is not anabled
    pass
Please note that the value in the configuration must be set to true to consider the feature to be enabled. If the feature is set to anything different or isn’t configured at all it is considered to be not enabled.
Layout
Default Overview complexity
Changed in version 1.5: Prior version 1.5 the default overview was always the more complex overview.
You can define which complexity the the overview pages in ringo will have on default. There are two complexities available:
- A simple Overview. This overview provides a simple search widget which may be enough for the most use cases.
- A advanced more complex overview. This overview provides a stackable search, regular expressions, pagination and a feature to save a search.
- layout.advanced_overviews = Default is false, which means without further configuration the simple overviews are used.
The complexity can be configured per overview table using the
table.json configuration which is available for all tables in the
system.
Session Timer
You can configure to show a session timer widget in the header of the application. The session timer will show the time left in the current session and provides a button to refresh the session.
- layout.show_sessiontimer = true.
Default is false, no widget is shown.
The time of the session timer is configured in Autologout.
Login Info
You can configure to show the last successful and last failed login on the start page. This can help the user to identify possible misuse of their account.
Additionally a warning is shown if there has been more than 5 failed login attemps since the last successful login.
- layout.show_logininfo = true.
Default is false, no info is shown.
Note
The login info is an inclued mako file in the index.mako template. Please do not forget to include the logininfo.mako template in your index page in case you have overwritten the index page.
Read and Update Pages
Modulname in title
Usually the title of the entry is in the format “Name of the modul: String representation of the modul”.
You configure to omit the leading name of the modul to have more space and options to show a more custom title your own title.
- layout.show_modulname = true
Default is true, so the name of the modul is shown is shown.
Contextmenu
You can configure if the context menu will be displayed in the detailed item view. For simple applications this menu might provide too much functionallity which tends to be confusing to other users. So you can completeley disable it.
- layout.show_contextmenu = true
Default is true, so the menu is shown.
Note
This setting only applies for users who does not have the admin role! Admins will always see the contextmenu available. Please not if your disable the menu the users will loose access to some default actions like changing the ownership.
Sessions
Beaker is used for session handling. Please refer to its documentation to get more information on the available configuraton options.
- session.type = file
- session.data_dir = %(here)s/data/sessions/data
- session.lock_dir = %(here)s/data/sessions/lock
- session.key = customerskey
- session.timeout = 1800
The following options regard to the cookie identifying the session in the client. The configuration option are taken from the global Cookies security settings:
- session.secret
- Defaults to security.cookie_secret
- session.secure
- Defaults to security.cookie_secure
- session.cookie_expires
- Defaults to security.cookie_expires
- session.httponly
- Defaults to security.cookie_httponly
- session.path
- Defaults to security.cookie_path
- session.domain
- Defaults to security.cookie_domain
Authentification
Authentication is stored with in a auth_tkt cookie. See Cookie options on for more details. The settings as taken from the global Cookies security settings.
Autologout
The authentication only stay valid for the given time. After that time a automatic logout from the application will happen.
- auth.timeout
- Defaults to 1800 seconds.
- auth.timeout_warning
- Defaults to 30 seconds.
The timeout_warning variable defines how many seconds before the actual logout a warning dialog will be raised.
If you want to display a nice sessiontimer than look also in Session Timer.
Passwort reminder and user registration
Ringo provides methods to allow users to register a new account or send requests to reset their passwords. Botch subsystems can be enabled by changing the following values.
- auth.register_user
- Defaults to false. Enable the option to let users register a new account. However the account must be finished by the administrator.
- auth.register_user_default_roles
- Defaults to the default user role. Can be defined as a comma separated list of role ids.
- auth.register_user_default_groups
- Defaults to the default user group. Can be defined as a comma separated list of group ids.
- auth.password_reminder
- Defaults to false. Enable the option to let the user reset their password.
Note
To enable this feature the mailsystem must be configured too. You need to set the mail host and the default sender in your config.
Note
To enable this feature the mailsystem must be configured too. You need to set the mail host and the default sender in your config.
Authentification callback
You can configure a callback method which is called after the user is basically authenticated. This callback can be used to cancel the authentification proccess by doing further checks on the user, or trigger some actions after the user logs in. The callback must have the following form:
from ringo.lib.security import AuthentificationException

def auth_callback(request, user):
    # permit admin user to login.
    if user.login == "admin":
        raise AuthentificationException("Admin is not allowed")
To cancel the authentification the function must raise an exception. The message of the exception is used as error message. In all other cases to user is authenticated.
Can need to configure this callback in the ini file:
auth.callback = foo.bar.callback
foo.bar.callback must be the modul path which can be used to import the function.
“Anonymous” access
But you can define a default user which is used as authenticated user:
- auth.anonymous_user
- Defaults to None. So no user is authenticated.
Warning
If enabled every user which enters the application will use the application as the configured user in the same way as the user really logs in.
You can define the user by givin the loginname of the user. Of course the user must be present in the application.
Security
CSRF Protection
To enable CSRF protection you can configure ringo to include a CSRF synchronizer token to each form to protect POST request against CSRF attacks.
- security.enable_csrf_check = true
- Defaults to true
However, for testing issues it might be useful to disable this feature.
Cookies
- security.cookie_secret
Defaults to a randomly generated 50 char long string. Value used to sign the cookie to prevent manipulation of the content of the cookie. If not set the value will be regenerated on every application start.
Tip
During development it is usefull to set the value to a static string to prevent invalidating the cookie on every application restart.
Important
In productive operation: Please ensure that this value is set to a randomly generated string. Either by not setting the value at all (and let the application generate a random string) or setting it to a static random generated string.
- security.cookie_secure
Default to false. If set to true the cookie is only accessible over a secure connection (SSL).
Important
In productive operation: Please ensure that this value is set to true if you use a SSL enabled connection.
- security.cookie_ip
Defaults to true. If set to true the cookie is bound to the IP address.
Caution
Although this settings can increase the security it may cause problems in if the IP address is not stable which is true for most dialup connections.
- security.cookie_httponly
- Defaults to true. If set to true the cookie is not accessible directly by the client but can only be changed through a http connection.
- security.cookie_expires
- Defaults to true. If set to true the cookie will expires after the browser is closed.
- security.cookie_path
- Defaults to /. The scope of the cookie will bound to the given path in the application.
- security.cookie_domain
- Defaults to the current domain and all subdomains (is automatically determined by the server). The scope of the cookie will bound to a specific domain.
- security.cookie_name
- Defaults to ‘auth_tkt’. Needs to be set in case you have multiple ringo applications on the same server.
Headers
See this page for more informations.
- security.header_secure = true
- security.header_clickjacking = true
- security.header_csp = false
You can define CSP Options by configuring one of the following options:
- security.csp.default_src
- security.csp.script_src
- security.csp.object_src
- security.csp.style_src
- security.csp.img_src
- security.csp.media_src
- security.csp.frame_src
- security.csp.font_src
- security.csp.connect_src
- security.csp.sandbox
- security.csp.frame_ancestors
Caching
Number of seconds the cached content will stay valid. A value of non means no caching at all and all elements are loaded on every request.
The enhance the security follwing the recommodation of measurement M 4.401 of BSI Grundschutz you should disable the caching.
- security.page_http_cache = 0
- security.static_http_cache = 3600
Note
The caching setting of the page currently only applies to the CRUD operations of the modules and not to the static pages like contact, home etc.
Warning
Caching of dynmic generated pages might result in some unexpected behaviour such as outdated items in overview lists. Therefor ther default disables caching here.
DB Caching
Warning
This feature is experimantal. It might change or removed completely in the next versions of Ringo.
Ringo supports file based caching of DB queries using a dogpile cache. Caching is disabled on default and must be enabled.
Note
Ringo does not try to use the cache on default. You will need to write code to tell Ringo to do so explicit! Unless you do not have any code that tries to use the cache you will not need to enable it here at all.
To enable the cache you need to define where to save the cache:
- db.cachedir = path/to/the/cachebasedir
The queries are cached in so called regions which will stay valid for a given time before the cache is invalidated. The regions can be configured in the following way:
- db.cacheregions = default:3600 short:50 …
The multiple regions are separated with spaces. A singe regions consists of the name and the time the regions should be valid. Name and time is colomn separated.
Mail
The configuration of the Mail system is described in detail in the documentation of the pyramid_mailer library
Below you find a show overview of the most common used settings. If you need more of the settings it is save to add them to your configuration.
- mail.host =
This is the host where your MTA will listen on port 25 to receive the mails which it will transfer to the recipients.
- mail.default_sender =
This is the default sender email (From:) of the mails sent from this application. Often this will be changed within the application anyway but we need to be sure we have a default sender. Often this is a “noreply@foo.bar” address.
- mail.username =
- mail.password =
In case your MTA requires some sort of authentication you can set it here.
Converter
The converter has become part of the ringo printtemplates extension. It is used to convert ODS files into PDF files.
Please see the README of the library for more details on how to configure the converter.
CLI ringo-admin
Use the following command to get general help on the available commands:
ringo-admin help
Important
All of the following commands will take the development.ini configuration file as their defautl configfile to retrieve informations like the db connection. Please make sure you set the correct config file before invoking the command to prevent operations on the wrong database!
ringo-admin db
Use the following command to get general help on the available commands:
ringo-admin db help
Generate migration
A new migration file can be generated with the following command:
ringo-admin db revision
Upgrade database
The database can be upgraded by applying the migration scripts:
ringo-admin db upgrade
Downgrade database
The database can be downgraded by removing the last migration scripts:
ringo-admin db downgrade
Export data
The data of a specfic module can be exported into a fixture by invoking the following command:
ringo-admin db savedata <modulname> > fixture.json
The default export format is JSON. You can change the export format to CSV by providing –format csv.
Only values of the given modul are exported. By default, this includes all fields of the module (including foreign keys) but not the related objects.
You can restrict the exported items by setting a –filter option. With a filter only items of the given modul matching the filter expression are exported. The filter expression is defined in the following syntax:
--filter expr,fieldname,isregex;[expr,fieldname,isregex;...]
expr defines the search expression and may be a regular expression if isregex is “1” (otherwise set to “0”). fieldname defines the name of the field on which the filter will be applied. If fieldname is empty, an item is exported if the search expression matches any of the fields of the default overview configuration.
Note
Filtering is limited to fields which are confiured in the items Overview configuration. You can not filter on fields which are not included in the overview. As a workaround you can setup hidden fields in the overview configuration.
If more than one filter is given, all filters must match to include the item in the export.
A more detailed configuration of the export can be achieved by providing a configuration file with the –export-config option. When using the configuration file all other options (like –format) have no effect anymore. The export format will be a nested JSON including all configured fields.
Details on the format of the export configuration file can be found in Configuration File.
Configuration File
-
class
ringo.lib.imexport.ExportConfiguration(jsonconfig)[source]¶ You can provide a JSON configuration file for the export to define which fields of the given modul should be exported in detail. Providing a configuration file allows you to export also properties and related items which are not part of the default export.
Example export configuration:
["f1", "f2", "f3", {"bar": ["f4", "f5", {"baz": [...]}}]
In this configuration “id”, “foo”, “bar” considered as fields of the exported item. In contrast the keys of the nested dictionarys are taken as the name of the relations. The following list defines again the fields of the items in the relation. So assuming you are exporting items of type “Foo” the export will include fields “f1”, “f2”, and “f3”. Further “Foo” is related to “Bar” items in the relation “bar”. From the “Bar” items the fields “f4” and “f5” are included. The “Bar” items have themself a relation called “baz” and again you can follow the scheme to define a detail configuration of what should be in the export.
The configuration also support wildcards. Use “*” so add all fields of the item or related item:
["*" {"bar": ["*", {"baz": [...]}}]
Import data
The data of a specfic module can be imported from a fixture by invoking the following command:
ringo-admin db loaddata <modulname> <fixture>
This will load the data in the fixture and insert or update the items in the database. Deleting items is not supported.
The option –loadbyid changes the mode how existing items in the database are identified for either update or, in case there is no record found, creating a new item. The default is to identify by the items UUID. With –loadbyid, the database primary key is used (which might differ between instances of your application!).
The option –format {json,csv} specifies the format of the input data, the default being JSON.
A JSON file must contain a list with objects corresponding to the modulname. Nested JSON files including related objects (corresponding to a relationship in the model that points to instances of BaseItem) are allowed. In case the nested file contains the same object multiple times, because it is included as a relation of multiple parent or child items, it can only be considered as the same object, if it can be identified by either UUID or primary key (see above). Otherwise multiple items will be created in the database or the import will fail if this is not possible (e.g. due to integrity constraints). Nested JSON files will usually be created by export (see Configuration File).
Items related via a many-to-many relationship with an import item can also be given as a list of primary keys that will be resolved during import.
Note that foreign keys, if they are part of relations not included as objects in a JSON file, must satisfy constraints in the target database. E.g. if an imported item has a foreign key attribute and the related item is not part of the import file, the value of the foreign key attribute must equal an existing value in the referenced column in the target database.
Fixing Sequences
After loading data into the database it is often needed to fix the sequences in the database to make the incremental counters work correct:
ringo-admin db fixsequence
Generate UUIDs
To regenerate UUIDs for the items of a given modul, use the following command:
ringo-admin db resetuuid <modulname>
Note that this makes your items unidentifiable if you import previously exported fixtures.
ringo-admin user
Use the following command to get general help on the available commands:
ringo-admin user help
Set password
The password of a given user can be changed/set by invoking the following command:
ringo-admin user <login> --password <password>
The password parameter is optional. If not given ringo will autoegenerate a new password for you.
ringo-admin fixtures
Initial data can inserted in the application by loading fixtures. Fixtures are basically the export of the item of a model in JSON format. Actually the whole loading and saving data is implemented by using the importer and exporter.
Note
Please note that you must take care to load the fixtures in correct order, because to keep the integrity of the database.
The folder for the fixtures should be named fixtures and located in the application folder.
The default location of the fixtures is the fixtures directory of your application. You can define an alternative path the the fixtures when invoking the load or save command by providing the –path option.
There are some naming conventions. Fixtures should be namen ‘NN_modulname.json’. NN means is used to order the fixtures and determines in which order the fixtures will be loaded. The modulname configures for which module the fixtures contains data. The name of the module name is identical with the name of the database table which has a appended “s”. E.g the user modul becomes to users. This is even true if the appended “s” is written wrong.
Use the following command to get general help on the available commands:
ringo-admin fixtures help
Load data
By invoking the following command:
ringo-admin fixtures load
all fixtures in the fixtures directory will be loaded and inserted in the database.
Using the –path allows to define a alternative path to the fixture files.
Save data
By invoking the following command:
ringo-admin fixtures save
all fixtures in the fixtures directory will be loaded and the data for each modul will be written into the fixture.
Using the –path allows to define a alternative path to the fixture files.
ringo-admin modul
Use the following command to get general help on the available commands:
ringo-admin modules help
Add new modul
By invoking the following command:
ringo-admin modul add <modulname in singular form>
A new modul will be added to your application. See Modules for more details.
Generate model fields from form config
By invoking the following command:
ringo-admin modul fields <name of the modul>
The python code with the SQLAlchemy model will be generated. The code can be pasted into the model.
ringo-admin app
Todo
Write me.
Application Deployment
Running the application in a different path than “/”
If the application is hosted in a subpath, than need to make sure that the SCRIPT_NAME and PATH_INFO variable are set correct, as both variables are crucial for a pyramid application to handle the requests and build urls using the request.route_* functions correct.
Ideally those variables are set before the request enters your application. This means you do this directly in the serving component. The configuration of the server components are out of scope of this documentation. Please refer to the documentation of your server component!
But instead of transforming the variables directly in the server you can also configure your application to do so. This way you get indepentend from the server, with the drawback that the information about the path need also be set in your application configuration. Here comes the following options.
Use a “prefix” middleware
All requests are routed through another middleware which will modify the SCRIPT_NAME and PATH_INFO. Here is how to configure it:
[filter:paste_prefix]
use = egg:PasteDeploy#prefix
prefix = /myapp

[pipeline:main]
pipeline =
   paste_prefix
   myapp

[app:myapp]
...
Build a “composite” application
Originally intended to map differen URLs to different applications/services (SAS) this can be also used to get the SCRIPT_NAME and PATH_INFO right. See Paste documentation for urlmap for more informations. Here is a short example to get the idea:
[composite:main]
use = egg:Paste#urlmap
# This is the mapping of the path /myapp to an application named
# myapp
/myapp = myapp
...

[app:myapp]
...
Examples
uWSGI & Nginx
Make sure your have installed the follwing additional packages in your virtualenv:
- uWSGI
- PasteDeploy (needed to be able to read the application configuration from the ini file)
- PasteScript (needed to get the logging configured based on the setting in the ini file)
Add the following into your ini file:
[uwsgi]
master = true
socket = /tmp/uwsgi.sock
virtualenv = /path/to/virtualenv

# PERMISSIONS
# Make sure that ngnix has permission to read and write to the socket.
# You can use one or more of the following options:
#chmod-socket =
#uid =
#gid =

# DAEMONIZE
# Send it in the background. If daemonize is set it wil log its output
# into given logfile
#daemonize = ./uwsgi.log
#pidfile = ./uwsgi.pid

# LOGGING
# paste-logger =
# Yes, there is no argument for the paste-logger.
Some notes on logging:
- The Logfile must be writeable for the uWSGI process!
- Make sure that your logging configuration of the application does not contain any place holders like “%(here)s”. They are not valid in the scope of uWSGI.
- On default the log of the uwsgi process will contain the requests as same as the logging from the application. If you want to separate this I advice you to disable to console logging in your pyramid application. Instead use a FileLogger which will log the logging in the application to a different location. See Pyramid logging documentation for more details
Add the following into your ngnix configuration:
location / {
    uwsgi_pass  unix:///tmp/uwsgi.sock;
    include     uwsgi_params;
}
Start the uwsgi server by invoking the following command:
uwsgi --ini-paste--logged development.ini
For debugging purpose I recommend to disable daemonizing in the uWSGI configuration.
Nginx as Reverse Proxy
Add the following into your ngnix configuration:
location / {
    proxy_set_header        Host $http_host;
    proxy_set_header        X-Real-IP $remote_addr;
    proxy_set_header        X-Forwarded-For $proxy_add_x_forwarded_for;
    proxy_set_header        X-Forwarded-Proto $scheme;
    proxy_pass http://localhost:7450;

}